Vous jouez au vétérinaire avec votre chien ?
Avez-vous déjà vu un chien blessé dans une bagarre ou renversé par une voiture ? Peut-être pourriez-vous seulement secouer la tête et partir. Non pas parce que vous vous en moquiez, mais parce que vous ne saviez pas comment approcher et examiner le chien ou quoi faire ensuite. Surtout si vous avez votre propre chien, vous voudrez être préparé, car votre chien dépend de vous pour l'aide en cas d'urgence.
Cet article vous donnera les informations et les techniques dont vous aurez besoin pour administrer les premiers soins en toute confiance et peut-être sauver la vie d'un animal de compagnie. De l'administration de la RCR au traitement d'une piqûre d'insecte, vous apprendrez à faire face à un large éventail d'urgences canines.
Commençons par apprendre à retenir correctement un chien blessé et effrayé, car ce sera la première chose à faire pour traiter la plupart des blessures chez les chiens.
Immobiliser un chien blessé
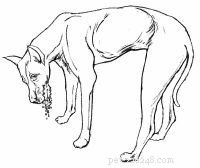
Un chien blessé est généralement effrayé et souffre, et à moins qu'il ne se sente très en sécurité avec votre présence, il peut essayer de s'échapper ou même de vous mordre. Il est donc important d'utiliser les conseils suivants lorsque vous approchez un chien blessé.
Étape 1 : Approchez-vous lentement du chien en lui parlant d'un ton rassurant.
Étape 2 : Rapprochez-vous du chien sans le toucher.
Étape 3 : Baissez-vous vers le chien. Tout en continuant à parler, observez ses yeux et son expression faciale.
Étape 3a : Si le chien a les yeux écarquillés et grogne, n'essayez PAS de le caresser. Passez à l'étape 4.
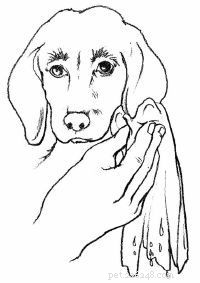
Étape 3b : Si le chien frissonne, la tête baissée et la bouche « souriante », caressez-le pour le rassurer, d'abord sous la mâchoire. Si cela est autorisé, caressez le chien sur la tête.
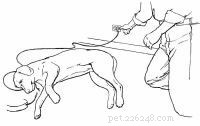
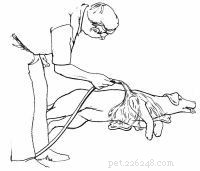
Étape 4 : Glissez une laisse autour du cou du chien. Utilisez n'importe quel matériel disponible :une corde, une cravate, une ceinture ou des chiffons déchirés.
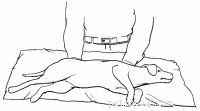
Étape 5 : Si vous êtes seul, placez la laisse autour d'un objet fixe, comme un poteau de clôture. Tirez le chien contre cet objet et attachez la laisse pour que le chien ne puisse pas bouger la tête.
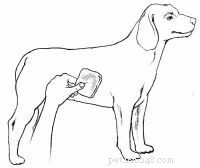
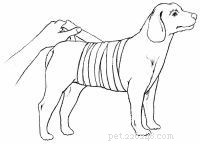
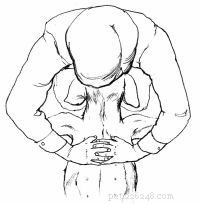
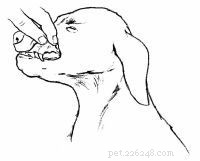
Étape 6 : Muselez le chien pour vous protéger.
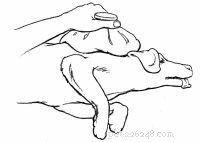
Étape 6a : À l'aide d'un long morceau de corde, de chiffons déchirés ou d'une cravate, faites une boucle sur le museau du chien et faites un nœud sous le menton.
Étape 6b : Apportez les extrémités de la corde, des chiffons ou attachez derrière les oreilles et attachez-les en un arc.
Étape 7 : Si vous êtes seul, procédez à l'administration du traitement.
Si vous avez un assistant
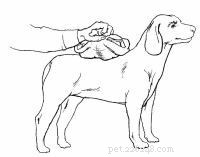
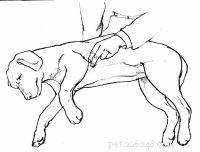
Étape 8 : Si possible, placez le chien sur une table ou une autre surface surélevée.
Étape 8a : Si le chien est petit, saisissez son collier d'une main et placez votre autre bras sur son dos et autour de son corps. En même temps, tirez le collier vers l'avant et soulevez le corps du chien, en le calant contre votre corps.
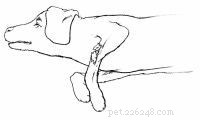
Étape 8b : Si le chien est grand, glissez un bras sous son cou en tenant sa gorge dans le creux de votre bras. Assurez-vous que le chien peut respirer facilement. Placez votre autre bras sous le ventre du chien. Soulevez avec les deux bras.
Étape 8c : Si le chien est très grand, glissez un bras sous son cou en tenant sa poitrine dans le creux de votre bras. Assurez-vous que le chien peut respirer facilement. Placez votre autre bras sous la croupe du chien et, en pressant vos bras l'un vers l'autre, soulevez le chien.
Étape 8d : Demandez à votre assistant d'administrer le traitement pendant que vous tenez le chien sur la table.
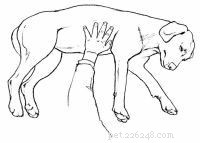
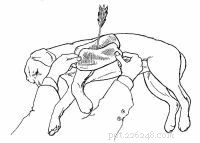
Étape 9 : Si vous voulez que le chien soit sur le côté :
Étape 9a : Tenez-vous debout ou agenouillez-vous pour que le chien soit devant vous, la tête à droite.
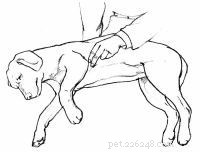
Étape 9b : Atteignez le dos du chien et attrapez la patte avant la plus proche de vous avec votre main droite et la patte arrière la plus proche de vous avec votre main gauche.
Étape 9c : Éloignez les pattes du chien de vous et faites glisser le chien le long de votre corps.
Étape 9d : Saisissez les deux pattes avant dans votre main droite et les deux pattes arrière dans votre main gauche.
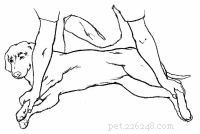
Étape 9e : Maintenez doucement le cou du chien avec votre bras droit.
Étape 9f : Demandez à votre assistant d'administrer le traitement.
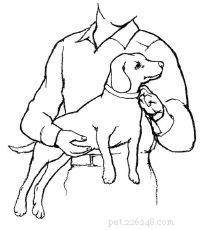
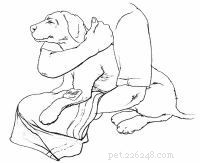
Étape 10 : Si vous voulez que le chien soit assis :
Étape 10a : Glissez un bras sous le cou du chien en tenant sa gorge dans le creux de votre bras. Assurez-vous que le chien peut respirer facilement.
Étape 10b : Placez votre autre bras sur le dos du chien et autour de son ventre.
Étape 10c : En appuyant le chien contre votre corps, appliquez le poids du corps sur les quartiers arrière du chien.
Étape 10d : Demandez à votre assistant d'administrer le traitement.
Étape 11 : Si vous voulez que le chien soit debout :
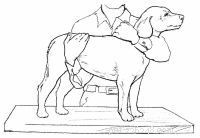
Étape 11a : Glissez un bras sous le cou du chien en tenant sa gorge dans le creux de votre bras. Assurez-vous que le chien peut respirer facilement.
Étape 11b : Placez votre autre bras sous le ventre du chien.
Étape 11c : Poussez le chien vers votre corps et soulevez-le vers le haut.
Étape 11d : Demandez à votre assistant d'administrer le traitement.
Apprendre à retenir un chien vous aidera dans presque toutes les situations d'urgence pour animaux de compagnie. Voyons maintenant comment transporter ce chien blessé chez le vétérinaire.
Trousse de premiers soins
Les propriétaires d'animaux doivent avoir les articles suivants à portée de main pour les urgences canines.
Lire la suite
Comment transporter un chien blessé
Une fois que vous avez retenu le chien blessé, vous voudrez l'amener chez un vétérinaire dès que possible. Essayez de ne pas déplacer un chien blessé plus que nécessaire et demandez à quelqu'un d'appeler le vétérinaire pour s'assurer qu'il est prêt pour votre arrivée. En attendant, utilisez les conseils suivants pour vous aider à transporter votre animal avec le plus grand soin.
Si le chien peut être soulevé
Étape 1 : Si le chien est petit :
Étape 1a : Saisissez son collier d'une main et placez votre autre bras sur son dos et autour de son corps.
Étape 1b : En même temps, tirez le collier vers l'avant et soulevez le corps du chien, en le calant contre votre corps.
Étape 2 : Si le chien est grand :
Étape 2a : Glissez un bras sous son cou en tenant sa gorge dans le creux de votre bras. Assurez-vous que le chien peut respirer facilement.
Étape 2b : Placez votre autre bras sous le ventre du chien. Soulevez avec les deux bras.
Étape 3 : Si le chien est très grand, glissez un bras sous son cou en tenant sa poitrine dans le creux de votre bras. Assurez-vous que le chien peut respirer facilement. Placez votre autre bras sous la croupe du chien et, en pressant vos bras l'un vers l'autre, soulevez le chien.
Étape 4 : Transportez le chien chez le vétérinaire.
Si le chien a besoin d'une civière
Une planche plate doit être utilisée si une fracture du dos est suspectée.
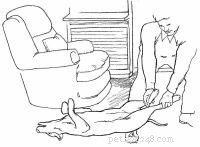
Étape 1 : Utilisez une couverture ou une planche plate comme civière. Si vous utilisez une planche, passez à l'étape 2. Si vous utilisez une couverture :
Étape 1a : Placez une main sous la poitrine du chien et l'autre sous ses fesses ; soulevez ou faites glisser délicatement le chien sur la couverture.
Étape 1b : Transportez le chien chez le vétérinaire.
Étape 2 : Si vous utilisez une planche plate :
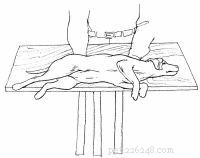
Étape 2a : Selon la taille du chien, utilisez une rallonge de table, une planche à repasser, une grande planche à découper ou une étagère amovible. Assurez-vous que tout ce que vous utilisez rentre dans votre voiture.
Étape 2b : Placez 2 ou 3 longues bandes de tissu ou de corde à égale distance sous la planche, en évitant la zone où le cou du chien reposera.
Étape 2c : Placez une main sous la poitrine du chien et l'autre sous ses fesses ; soulevez ou faites glisser délicatement le chien sur la planche.
Étape 2d : Attachez le chien à la planche.
Étape 2e : Transportez le chien chez le vétérinaire.
Une autre technique qui peut s'avérer utile dans de nombreuses situations de premiers secours consiste à donner des médicaments par voie orale à votre animal. Consultez la page suivante pour obtenir des conseils utiles sur l'administration des médicaments.
Comment administrer des médicaments oraux à un chien
Que vous ayez besoin d'administrer des analgésiques après une blessure grave ou que ce soit juste le moment de prendre la pilule mensuelle contre le ver du cœur de votre animal, apprendre à administrer facilement des médicaments par voie orale à un chien est une astuce utile à connaître. Utilisez les conseils suivants pour vous aider à administrer des médicaments liquides ou en comprimés à votre chien.
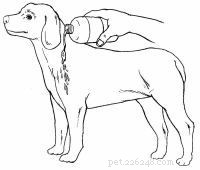
Liquides
Étape 1 : Retenez le chien. Si le chien est difficile à manipuler, vous aurez peut-être besoin d'aide pour le retenir.
Étape 1a : Soulagez l'appréhension du chien en parlant doucement et de manière rassurante.
Étape 1b : Glissez un bras sous le cou du chien en tenant doucement sa gorge dans le creux de votre bras. Assurez-vous que le chien peut respirer facilement.
Étape 1c : Passez l'autre bras au-dessus ou en dessous du milieu du chien, en exerçant une pression douce mais ferme pour maintenir son corps contre le vôtre.
Étape 1d : Si nécessaire, appliquez une attache buccale sans serrer afin qu'il n'y ait qu'un léger mouvement de la mâchoire.
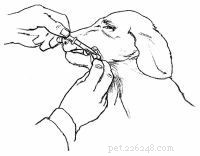
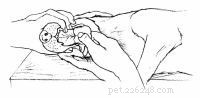
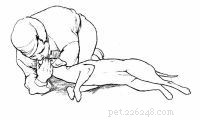
Étape 2 : Inclinez doucement la tête du chien légèrement vers l'arrière.
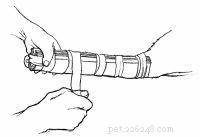
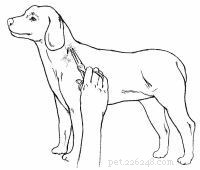
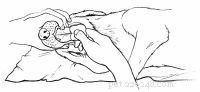
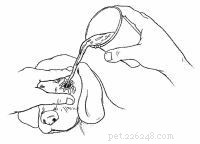
Étape 3 : Tirez la lèvre inférieure du chien au coin pour faire une poche.
Étape 4 : À l'aide d'un compte-gouttes en plastique ou d'une seringue doseuse, placez le liquide un peu à la fois dans la poche, en permettant à chaque petite quantité d'être avalée avant de donner plus de dose.
Étape 5 : Frottez doucement la gorge du chien pour stimuler la déglutition.
Pilules
Étape 1 : Retenez le chien. Si le chien est difficile à manipuler, vous aurez peut-être besoin d'aide pour le retenir.
Étape 1a : Soulagez l'appréhension du chien en parlant doucement et de manière rassurante.
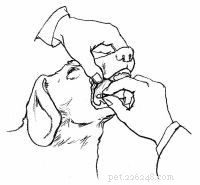
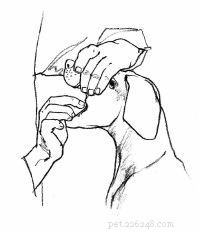
Étape 2 : Saisissez la mâchoire supérieure du chien avec une main sur son museau.
Étape 3 : Appuyez sur les lèvres du chien sur les dents supérieures en appuyant votre pouce d'un côté et vos doigts de l'autre pour que les lèvres du chien soient entre ses dents et vos doigts. Appliquez une pression ferme pour forcer sa bouche à s'ouvrir.
Étape 4 : Tenez la pilule entre le pouce et l'index de votre autre main et placez la pilule aussi loin que possible dans la gueule du chien.
Étape 5 : Frottez doucement la gorge du chien pour stimuler la déglutition.
Une autre méthode consiste à dissimuler la pilule dans du fromage, du beurre de cacahuète ou d'autres friandises délicieuses.
Le sang sur un chien peut être le signe d'une blessure grave ou simplement d'une légère entaille à la patte. Dans la section suivante, nous verrons comment repérer les différents signes et quoi faire pour aider un animal qui saigne.
Comment traiter un chien qui saigne
Les pattes et les jambes d'un chien sont vulnérables aux blessures causées par du verre brisé, des ongles et d'autres objets pointus, et elles saignent abondamment lorsqu'elles sont coupées. Une oreille blessée saignera également abondamment car la peau qui recouvre l'oreille est très fine.
Avec toute blessure hémorragique, le but principal des premiers soins est d'éviter une perte de sang excessive, qui peut entraîner un choc. Les signes de choc comprennent des gencives pâles ou blanches, un rythme cardiaque rapide ou une respiration rapide. Si une blessure crache du sang, cela signifie qu'une artère a été sectionnée. Cela nécessite une attention professionnelle immédiate.
La façon dont vous vous occupez de votre chien dépendra de l'emplacement et de l'étendue du saignement. Les conseils de soins pour chiens suivants vous aideront à appliquer les premiers soins à différentes zones du corps.
Tête ou torse de chien qui saigne
Étape 1 : Immobilisez le chien si nécessaire.
Étape 1a : Approchez-vous lentement du chien en lui parlant d'un ton rassurant.
Étape 1b : Glissez une laisse autour du cou du chien, puis placez la laisse autour d'un objet fixe. Tirez le chien contre cet objet et attachez la laisse pour que le chien ne puisse pas bouger la tête.
Étape 1c : Muselez le chien pour vous protéger.
Étape 2 : Couvrez la plaie avec une compresse de gaze stérile, une serviette pliée propre ou une serviette hygiénique.
Étape 3 : Enroulez des chiffons déchirés ou un autre matériau doux autour du pansement et attachez-le ou scotchez-le juste assez pour maintenir le bandage en place.
Étape 4 : Transportez immédiatement le chien chez le vétérinaire.
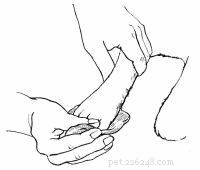
La patte, la patte ou la queue du chien qui saigne
Étape 1 : Immobilisez le chien si nécessaire.
Étape 1a : Approchez-vous lentement du chien en lui parlant d'un ton rassurant.
Étape 2 : Coupez les cheveux autour de la zone blessée.
Étape 3 : Examinez la plaie pour du verre ou d'autres objets étrangers. S'il est visible, retirez l'objet avec vos doigts ou une pince à épiler. Si le tissu sous la plaie semble passer lorsque vous bougez la peau, la plaie nécessitera probablement des points de suture.
Étape 4 : Rincez abondamment la plaie à l'eau claire. Évitez les antiseptiques domestiques, qui peuvent causer de la douleur lorsqu'ils sont appliqués.
Étape 5 : Couvrez la plaie avec un chiffon propre, un pansement stérile ou une serviette hygiénique.
Étape 6 : Placez votre main sur le pansement et appuyez fermement.
Étape 7 : Maintenez la pression sur le pansement pour arrêter le saignement. Si du sang traverse le pansement, NE PAS le retirer. Appliquez plus de pansement et continuez à appliquer une pression jusqu'à ce que le saignement s'arrête. Si le saignement ne s'arrête pas dans les 5 minutes, continuez à appliquer une pression sur la plaie tout en transportant le chien chez le vétérinaire.
Étape 8 : Enroulez des chiffons déchirés ou un autre matériau doux autour du pansement et attachez-le ou scotchez-le juste assez pour que le pansement reste en place. Commencez sous la plaie et remontez vers le haut.
Étape 9 : Si la plaie est suffisamment profonde pour nécessiter des points de suture, éloignez le chien de la jambe blessée et transportez immédiatement votre animal chez le vétérinaire.
Poitrine ou abdomen saignant du chien
Étape 1 : Immobilisez le chien si nécessaire.
Étape 1a : Approchez-vous lentement du chien en lui parlant d'un ton rassurant.
Étape 1b : Muselez le chien pour vous protéger.
Étape 2 : Si la plaie est dans la poitrine et qu'un bruit de "succion" se fait entendre, pansez la plaie assez fermement pour empêcher l'air d'entrer et transportez immédiatement le chien chez le vétérinaire. Si ce n'est pas le cas, passez à l'étape 3.
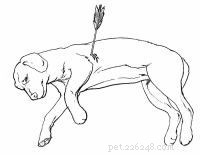
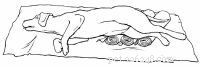
Étape 3 : S'il y a un objet en saillie, comme une flèche, N'essayez PAS de retirer l'objet. Si ce n'est pas le cas, passez à l'étape 4.
Étape 3a : Placez des chiffons propres, des pansements stériles ou des serviettes hygiéniques autour du point d'entrée.
Étape 3b : Bandez fermement autour du point d'entrée.
Étape 3c : Transportez immédiatement le chien chez le vétérinaire.
Étape 4 : Coupez les cheveux autour de la zone blessée.
Étape 5 : Examinez la plaie pour du verre ou d'autres objets étrangers. S'il est visible, retirez l'objet avec vos doigts ou une pince à épiler. Si le tissu sous la plaie semble passer lorsque vous bougez la peau, la plaie nécessitera probablement des points de suture.
Étape 6 : Rincez abondamment la plaie à l'eau claire.
Étape 7 : Couvrez la plaie avec un chiffon propre, un pansement stérile ou une serviette hygiénique.
Étape 8 : Placez votre main sur le pansement et appuyez fermement.
Étape 9 : Maintenez la pression sur le pansement pour arrêter le saignement. Si du sang traverse le pansement, NE PAS le retirer. Appliquez plus de pansement et continuez à appliquer une pression jusqu'à ce que le saignement s'arrête.
Étape 10 : Enroulez des draps déchirés ou un autre matériau souple autour du pansement et attachez-le ou scotchez-le juste assez pour maintenir le bandage en place.
Étape 11 : Si la plaie est suffisamment profonde pour nécessiter des points de suture, transportez immédiatement le chien chez le vétérinaire.
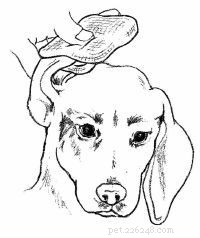
L'oreille qui saigne du chien
Étape 1 : Immobilisez le chien si nécessaire.
Étape 1a : Approchez-vous lentement du chien en lui parlant d'un ton rassurant.
Étape 1b : Muselez le chien pour vous protéger.
Étape 2 : Couvrez la plaie avec un chiffon propre, un pansement stérile ou une serviette hygiénique. Placez le pansement des deux côtés du rabat auriculaire, puis pliez-le sur le dessus de la tête du chien et maintenez-le fermement pour contrôler le saignement.
Étape 3 : Enroulez des feuilles ou des chiffons déchirés autour du pansement, de l'oreille et de la tête, en vous assurant que toute l'oreille est couverte. Collez ou attachez le bandage en place.
Étape 4 : Transportez immédiatement le chien chez le vétérinaire.
Les ongles qui saignent du chien
Un ongle cassé ou coupé trop court sont les raisons les plus courantes d'un ongle qui saigne. Assurez-vous d'amener votre chien chez le toiletteur si vous n'êtes pas à l'aise pour lui couper les griffes.
Si l'ongle est cassé :
Étape 1 : Immobilisez le chien si nécessaire.
Étape 1a : Approchez-vous lentement du chien en lui parlant d'un ton rassurant.
Étape 2 : N'essayez PAS de couper ou d'enlever l'ongle cassé sans museler le chien.
Étape 3 : Tenez un chiffon propre, un pansement stérile ou une serviette hygiénique contre l'ongle. Le saignement s'arrêtera dans quelques minutes.
Étape 4 : Transportez le chien chez le vétérinaire dès que possible.
Si l'ongle est coupé trop court :
Étape 1 : Immobilisez le chien si nécessaire.
Étape 1a : Approchez-vous lentement du chien en lui parlant d'un ton rassurant.
Étape 1b : Glissez une laisse autour du cou du chien, puis placez la laisse autour d'un objet fixe. Tirez le chien contre cet objet et attachez la laisse pour que le chien ne puisse pas bouger la tête.
Étape 1c : Muselez le chien pour vous protéger.
Étape 2 : Tenez un chiffon propre, un pansement stérile ou une serviette hygiénique contre l'ongle.
Étape 3 : Maintenez une pression ferme sur la zone pendant au moins 5 minutes. NE PAS retirer le pansement tant que le saignement ne s'est pas arrêté.
Étape 4 : Si le saignement ne s'arrête pas en 15 à 20 minutes, transportez le chien chez le vétérinaire dès que possible. Un saignement continu indique un trouble de la coagulation qui doit être traité rapidement.
Saignement interne
L'hémorragie interne est toujours une urgence. Les signes d'hémorragie interne sont des gencives pâles ou blanches; rythme cardiaque ou respiration rapide; et saignement des oreilles, du nez, de la bouche ou du rectum. Les étapes suivantes vous aideront à traiter le chien pour tout choc potentiel et à transporter immédiatement le chien vers une aide professionnelle.
Étape 1 : S'il y a des saignements provenant de blessures externes, traitez le choc.
Étape 1a : Examinez les gencives en soulevant doucement la lèvre supérieure pour que la gencive soit visible. Des gencives pâles ou blanches indiquent que le chien est presque certainement en état de choc et peut avoir de graves blessures internes et/ou des saignements. Si les gencives sont roses, le chien n'est probablement pas en état de choc.
Étape 1b : Déterminez le rythme cardiaque. Placez vos doigts fermement sur le chien à environ 2 pouces derrière le coude du chien au centre de sa poitrine. Comptez le nombre de battements en 10 secondes et multipliez par 6. Si le chien est en état de choc, son rythme cardiaque peut être supérieur à 150 battements par minute.
Étape 2 : Placez le chien sur le côté avec la tête allongée.
Étape 3 : Tirez doucement la langue du chien pour garder les voies respiratoires ouvertes.
Étape 4 : Élevez légèrement l'arrière-train du chien en le plaçant sur un oreiller ou des serviettes pliées.
Étape 5 : Pour conserver la chaleur corporelle, enveloppez le chien dans une couverture ou une veste.
Étape 6 : Transportez immédiatement le chien chez le vétérinaire.
Le ballonnement est une maladie grave qui peut entraîner la mort subite d'un chien. Dans la section suivante, nous discuterons des signes de ballonnements et de ce qu'il faut faire si vous soupçonnez que votre animal en souffre.
Comment traiter un chien ballonné
Il est difficile d'accepter le fait qu'un chien apparemment en bonne santé puisse, en une heure, se battre pour sa vie. Le ballonnement est une maladie extrêmement grave, potentiellement mortelle. Un traitement professionnel est urgent et ne doit pas être retardé.
Le ballonnement semble affecter davantage les grands chiens à poitrine profonde que les autres races. Les symptômes sont dramatiques et sans équivoque et comprennent une bave excessive, une stimulation et une agitation; un abdomen élargi; et de fréquentes tentatives de vomissements, qui produisent de grandes quantités de mousse blanche ou rien du tout.
Il n'y a pas d'explication scientifique satisfaisante quant à la raison pour laquelle le ballonnement se produit. En gros, l'estomac se remplit de gaz, comme un ballon gonflé. Mais avec le ballon, il y a de la place pour l'expansion. Avec l'estomac, il n'y en a pas, donc le gaz exerce une pression sur la rate, le foie et d'autres organes internes.
Si vous soupçonnez que votre animal souffre de ballonnements, transportez-le immédiatement chez le vétérinaire. Le ballonnement est fréquemment suivi d'une torsion gastrique (retournement de l'estomac), qui entraîne un choc et la mort en quelques heures.
Pour éviter les ballonnements et les torsions qui en résultent, donnez au chien de petits repas plusieurs fois par jour plutôt qu'un seul gros repas, et veillez à éviter les exercices intenses après les repas.
Consultez la section suivante pour obtenir des conseils sur ce qu'il faut faire si votre animal a une jambe cassée, y compris comment attacher une attelle.
Comment traiter un chien avec une patte cassée
Chez le chien, comme chez l'être humain, tous les os sont sujets à la casse, mais les fractures des pattes sont de loin les plus fréquentes. Il est important de se rappeler que les chiens ont une tolérance élevée à la douleur et qu'une jambe pendante semble souvent ne causer aucune douleur. Par conséquent, n'ayez pas peur de manipuler le membre fracturé (mais soyez doux !). Le chien vous fera savoir si ça fait mal.
Certains signes à rechercher incluent une jambe qui semble déformée, qui pend mollement, qui ne peut pas supporter le poids du corps et qui est enflée. Faites également attention aux signes de choc, notamment des gencives pâles ou blanches, un rythme cardiaque rapide ou une respiration rapide.
Pour prendre soin de l'os cassé de votre chien, utilisez les conseils suivants.
Étape 1 : Immobilisez le chien si nécessaire.
Étape 1a : Approchez-vous lentement du chien en lui parlant d'un ton rassurant.
Étape 1b : Glissez une laisse autour du cou du chien, puis placez la laisse autour d'un objet fixe. Tirez le chien contre cet objet et attachez la laisse pour que le chien ne puisse pas bouger la tête.
Étape 1c : Muselez le chien pour vous protéger.
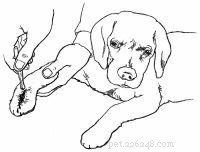
Étape 2 : Examinez la jambe et déterminez si la fracture est ouverte (plaie près de la fracture ou os dépassant de la peau) ou fermée (pas de fracture dans la peau).
Étape 3 : Si la fracture est fermée, passez à l'étape 4. Si la fracture est ouverte :
Étape 3a : Rincez abondamment la plaie à l'eau claire.
Étape 3b : Couvrez la plaie avec un pansement stérile, un chiffon propre ou une serviette hygiénique.
Étape 3c : N'essayez PAS d'atteller la fracture. Tenez une grande serviette pliée sous le membre sans attelle et transportez immédiatement le chien chez le vétérinaire.
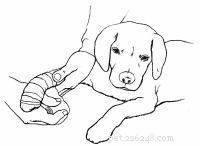
Étape 4 : Si le membre cassé est grossièrement déformé ou si le chien semble souffrir beaucoup lorsque vous essayez de poser une attelle, arrêtez-vous et passez à l'étape 5. Sinon, passez à l'attelle.
Étape 4a : Utilisez n'importe quel matériau d'attelle disponible - bâtons, journaux, magazines ou carton rigide. Le but est d'immobiliser le membre et non de le réinitialiser.
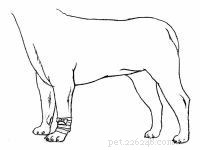
Étape 4b : Fixez les attelles à la jambe fracturée avec des bandes de tissu ou de gaze déchirées.
Étape 4c : Collez ou attachez les bandes fermement mais pas trop serrées pour ne pas nuire à la circulation.
Étape 4d : Transportez immédiatement le chien chez le vétérinaire.
Étape 5 : Si le membre cassé est grossièrement déformé ou si le chien semble souffrir beaucoup lorsque vous essayez d'atteller, tenez une grande serviette sous le membre non attelle pour le soutenir et transportez immédiatement le chien chez le vétérinaire.
Préparez-vous aux brûlures de votre animal en consultant les conseils de la section suivante.
Comment traiter un chien brûlé
Les chiens adorent être sous les pieds pendant que leurs propriétaires cuisinent. Bien que cela puisse être un trait admirable du meilleur ami de l'homme, cela peut aussi être dangereux lorsque de l'eau bouillante ou de l'huile de cuisson chaude est utilisée dans la cuisine.
Un chien peut subir des brûlures au premier, deuxième ou troisième degré causées par le feu, la chaleur, les liquides bouillants, les produits chimiques et l'électricité. Tous sont douloureux et peuvent causer des dommages, voire la mort. Les brûlures superficielles, qui se manifestent par une douleur et une rougeur de la peau, ne sont généralement pas graves. Cependant, les premiers soins doivent être donnés dès que possible pour soulager la douleur.
Les conseils suivants vous aideront non seulement à identifier le type de brûlure auquel vous êtes confronté, mais vous donneront également des suggestions sur la meilleure façon de traiter la blessure.
Brûlures au premier ou au second degré
Les signes d'une brûlure au premier degré comprennent une fourrure intacte ou brûlée, des lésions douloureuses ou une peau rouge avec d'éventuelles cloques. Les signes d'une brûlure au deuxième degré sont des poils brûlés ou des lésions douloureuses qui deviennent bronzées avec un gonflement et des cloques. Si vous remarquez l'un de ces signes avant-coureurs, voici ce qu'il faut faire :
Étape 1 : Immobilisez le chien si nécessaire.
.
Étape 2 : Appliquez de l'eau froide ou des compresses de glace sur la zone brûlée et laissez en contact avec la peau pendant 15 minutes. NE PAS appliquer de pommade ou de beurre.
Étape 3 : Si les brûlures couvrent une grande partie du corps du chien ou sont situées là où le chien peut les lécher, couvrez la zone avec un pansement stérile. NE PAS utiliser de coton.
Étape 4 : Enroulez des chiffons déchirés ou un autre matériau doux autour du pansement et attachez-le ou scotchez-le juste assez pour le maintenir en place.
Étape 5 : Transportez le chien chez le vétérinaire dès que possible.
Brûlures au troisième degré
Les signes d'une brûlure au troisième degré comprennent la destruction de toute la surface de la peau, des lésions noires ou d'un blanc pur ou une fourrure qui se retire facilement. Surveillez également les signes de choc, notamment des gencives pâles ou blanches, un rythme cardiaque rapide ou une respiration rapide. Si vous remarquez ces signes, voici ce qu'il faut faire :
Étape 1 : Immobilisez le chien si nécessaire.
Étape 1a : Approchez-vous lentement du chien en lui parlant d'un ton rassurant.
Étape 2 : Examinez le chien pour un état de choc. S'il n'est pas en état de choc, passez à l'étape 3.
Étape 2a : Examinez les gencives en soulevant doucement la lèvre supérieure pour que la gencive soit visible. Des gencives pâles ou blanches indiquent que le chien est presque certainement en état de choc. Si les gencives sont roses, le chien n'est probablement pas en état de choc.
Étape 2b : Déterminez le rythme cardiaque. Placez fermement les doigts sur le chien à environ 2 pouces derrière le coude du chien au centre de sa poitrine. Comptez le nombre de battements en 10 secondes et multipliez par 6. Si le chien est en état de choc, son rythme cardiaque peut être supérieur à 150 battements par minute.
Étape 2c : Placez le chien sur le côté avec la tête allongée. Tirez doucement la langue du chien pour garder les voies respiratoires ouvertes.
Étape 2d : Élevez légèrement l'arrière-train du chien en le plaçant sur un oreiller ou des serviettes pliées. Pour conserver la chaleur corporelle, enveloppez le chien dans une couverture ou une veste.
Étape 3 : NE PAS appliquer de pommade ou de beurre. Appliquez un pansement sec et propre sur la zone brûlée. NE PAS utiliser de coton.
Étape 4 : Enroulez des chiffons déchirés ou un autre matériau doux autour du pansement et attachez-le ou scotchez-le juste assez pour le maintenir en place.
Étape 5 : Transportez le chien chez le vétérinaire dès que possible.
Brûlures chimiques
Les signes d'une brûlure chimique comprennent une odeur chimique comme la térébenthine, l'essence ou l'insecticide; peau rougie; ou la douleur. Si vous remarquez ces signes, procédez comme suit :
Étape 1 : Immobilisez le chien si nécessaire.
Étape 1a : Approchez-vous lentement du chien en lui parlant d'un ton rassurant.
Étape 2 : Lavez soigneusement la zone avec de l'eau et du savon; répéter autant de fois que nécessaire pour éliminer le produit chimique. Utilisez un savon doux et faites bien mousser. NE PAS utiliser de solvants d'aucune sorte.
Étape 3 : Appelez le vétérinaire pour plus d'instructions.
Votre chien touche-t-il à tout et n'importe quoi ? Consultez la section suivante pour obtenir des conseils de premiers secours sur le traitement d'un chien qui s'étouffe, y compris comment dégager les voies respiratoires et administrer la RCR.
Comment traiter un chien qui s'étouffe
Lorsqu'un chien s'étouffe avec un objet étranger, il a besoin d'aide immédiatement. Plus il essaie de respirer, plus il devient paniqué. Votre objectif dans cette situation d'urgence est d'ouvrir les voies respiratoires du chien sans être mordu.
Les signes qu'un chien s'étouffe comprennent des coups de patte à la bouche, une langue pâle ou bleue, une détresse évidente ou une perte de conscience. Si le chien est inconscient et que vous pensez qu'un objet étranger est présent, vous devez ouvrir les voies respiratoires avant de pratiquer la réanimation cardio-pulmonaire (RCP). Si le chien ne peut pas respirer, les efforts pour le ranimer seront vains.
Bien que tout cela semble assez accablant, vous pouvez aider un chien qui s'étouffe ou qui est inconscient en suivant les conseils de base décrits ci-dessous. Vos efforts peuvent sauver la vie d'un chien !
Étape 1 : Immobilisez le chien si nécessaire.
Étape 1a : Approchez-vous lentement du chien en lui parlant d'un ton rassurant.
Étape 2 : Dégagez les voies respiratoires.
Étape 2a : Ouvrez la bouche du chien avec précaution en saisissant la mâchoire supérieure d'une main au-dessus du museau.
Étape 2b : Appuyez sur les lèvres du chien sur les dents supérieures en appuyant votre pouce d'un côté et vos doigts de l'autre afin que les lèvres soient entre les dents du chien et vos doigts. Appliquez une pression ferme pour forcer la bouche à s'ouvrir.
Étape 2c : Si vous pouvez voir l'objet, essayez de le retirer avec vos doigts.
Étape 2d : Si vous ne pouvez pas retirer l'objet et que le chien est assez petit, ramassez-le en saisissant ses pattes arrière; retournez-le et secouez vigoureusement. Frapper son dos tout en secouant peut aider à déloger l'objet.
Étape 2e : Si vous ne pouvez pas retirer l'objet et que le chien est trop gros pour être ramassé, placez-le sur le côté sur le sol. Placez votre main juste derrière la cage thoracique et appuyez rapidement et fermement vers le bas et légèrement vers l'avant. Libérer. Répétez rapidement plusieurs fois jusqu'à ce que l'objet soit expulsé.
Étape 3 : Si vous ne pouvez pas déloger l'objet, transportez immédiatement le chien chez le vétérinaire.
Étape 4 : Si vous délogez l'objet et que le chien ne respire pas, sentez un battement de cœur en plaçant vos doigts à environ 2 pouces derrière le coude du chien au milieu de sa poitrine.
Étape 5 : Si le cœur du chien ne bat pas, passez à l'étape 6. Si c'est le cas, pratiquez la respiration artificielle.
Étape 5a : Tournez le chien sur le côté.
Étape 5b : Étendez la tête et le cou du chien. Tenez la bouche et les lèvres du chien fermées et soufflez fermement dans ses narines. Administrez 1 respiration toutes les 3 à 5 secondes. Respirez profondément et répétez jusqu'à ce que vous sentiez une résistance ou que vous voyiez la poitrine se soulever.
Étape 5c : Après 10 secondes, arrêtez. Observez le mouvement de la poitrine pour indiquer que le chien respire tout seul.
Étape 5d : If the dog is not breathing, continue artificial respiration.
Step 6: If the heart is not beating, perform CPR.
CPR for Dogs Weighing up to 45 Pounds
Step 6a: Turn the dog on its back.
Step 6b: Kneel down at the head of the dog.
Step 6c: Clasp your hands over the dog's chest with your palms resting on either side of its chest.
Step 6d: Compress your palms on the chest firmly for a count of "2," and release for a count of "1." Moderate pressure is required. Repeat about 60 to 90 times per minute.
Step 6e: Alternately (after 30 seconds), hold the dog's mouth and lips closed and blow firmly into its nostrils. Blow for 3 seconds, take a deep breath, and repeat until you feel resistance or see the dog's chest rise. Try to repeat this 10 to 20 times per minute. As a general rule, use a CPR ratio of about 5 heart compressions to 1 breath of air.
Step 6f: After 1 minute, stop. Look at the chest for breathing movement, and feel for a heartbeat by placing fingers about 2 inches behind the dog's elbow in the center of its chest.
Step 6g: If the dog's heart is not beating, continue CPR. If the heart starts beating, but the dog is still not breathing, return to Step 5.
CPR for Dogs Weighing More Than 45 Pounds
Step 6a: Turn the dog on its side.
Step 6b: Place the palm of your hand in the middle of the dog's chest.
Step 6c: Press for a count of "2," and release for a count of "1." Firm pressure is required. Repeat about 60 to 90 times per minute.
Step 6d: Alternately (after 30 seconds), hold the dog's mouth and lips closed and blow firmly into its nostrils. Blow for 3 seconds, take a deep breath, and repeat until you feel resistance or see the chest rise. Try to repeat this 10 to 20 times per minute.
Step 6e: After 1 minute, stop. Look at the chest for breathing movement, and feel for a heartbeat by placing your fingers about 2 inches behind the dog's elbow in the center of its chest.
Step 6f: If the dog's heart is not beating, continue CPR. If the heart starts beating but the dog is still not breathing, return to Step 5.
Step 7: Transport the dog immediately to the veterinarian. CPR or artificial respiration should be continued on the way to the veterinarian or until dog is breathing and its heart is beating without assistance.
Witnessing a seizure can be a scary thing, but don't panic. Use the tips on the next page to help you if your pet experiences convulsions or seizures.
How to Treat a Dog That Has Convulsions/Seizures
A convulsion or seizure is the result of constant electrical firing of the muscles of the body from the brain. Convulsions are rarely fatal, and most last only a few minutes. A typical seizure is then followed by 15 minutes to a half hour of recovery time, during which period the dog may be dazed and confused.
Not all seizures are due to epilepsy. Some are caused by lead or other poisons, liver diseases, and even brain tumors. Seizures or convulsions should never be taken lightly. The problem should be discussed with your veterinarian as soon as possible.
The most important thing to do if your dog is experiencing a seizure is to protect it from self-injury. Be patient, don't panic, and use the following tips to provide proper care.
Step 1: DO NOT place your fingers or any object in the dog's mouth.
Step 2: Pull the dog away from walls and furniture to prevent self-injury.
Step 3: Seizures can raise your dog's body temperature fast, so don't wrap the dog in a blanket or towel for comfort until the seizure is over. Instead, place cool washcloths on his feet to help keep his temperature from rising.
Step 4: After the seizure has stopped, contact your veterinarian for further instructions. You can now wrap your dog in a towel or blanket to comfort him after the seizure he's alert.
Step 5: If you're able to, time your dog's seizure. If it lasts less than 2 minutes, he should be OK but you should still consult with your veterinarian. If it lasts between 2 and 5 minutes, this is starting to hit the warning zone and you dog should take your dog to the vet as soon as possible. If the seizure lasts longer than 5 minutes, he needs to be treated by your veterinarian immediately.
A common ailment among most pets, diarrhea can become a serious problem if not treated properly. Turn to the next section for helpful tips.
How to Treat a Dog That Has Diarrhea
Diarrhea is a commonly encountered problem that occurs when food is passed through a dog's intestine too rapidly. It can be caused by allergies, milk, parasites, spoiled food, or bacterial infection. There are also more serious causes such as tumors; viral infections; and diseases of the liver, pancreas, and kidney.
Be sure to seek professional help if blood, severe depression, or abdominal pain are present in your pet. Otherwise, use the following suggestions to help ease a dog's discomfort.
Step 1: Remove all food for 12 to 24 hours. Water is important to prevent dehydration in severe diarrhea. It should not be removed.
Step 2: If blood appears or if diarrhea continues for more than 24 hours, contact the veterinarian. He or she will probably want to see a stool sample.
Step 3: After at least 12 hours, treat the dog by feeding it a bland diet such as boiled skinless chicken and rice (50:50 mixture). When stools begin to form, slowly phase back to regular diet. Kaopectate or Pepto-Bismol can be safely used in dogs. Call your veterinarian for the correct dosage for your pet.
When people think of animal bites, they usually think of a human being bit by a dog. But dogs can also be the victims of bites from dogs or other animals lurking in the backyard. Check the next section for first-aid tips when your dog experiences an animal bite.
How to Treat a Dog With an Animal Bite
When a dog gets into a fight with another dog, a cat, or a wild animal, damage can occur to both the skin and the underlying tissue. Many dogfights can be avoided by not permitting your dog to run loose and by keeping it on a leash when you walk it. The dog should also be trained to obey your commands.
If your dog does get into a fight, do not try to break it up with your bare hands. A fighting dog will bite anything in its way, including you. Pull your leashed dog out of harm's way or use a long stick. After the fight is over, examine your dog carefully for hidden wounds. You'll often find punctures around the neck area and on the legs. Look through the hair carefully to find bloodstains, which would indicate the skin has been punctured.
It is important to determine if the biting animal has been inoculated against rabies. If the biter is a wild animal such as a skunk or raccoon, efforts should be made to destroy it so the brain can be examined for rabies. Never touch the wild animal with your bare hands, even after it has been killed. Wear gloves or wrap the body in a blanket. Your veterinarian will take care of the rabies examination.
To provide proper care to a dog suffering from an animal bite, use the following tips.
Step 1: Restrain the dog if necessary.
Step 1a: Approach the dog slowly, speaking in a reassuring tone of voice.
Step 1b: Slip a leash around the dog's neck, then place the leash around a fixed object. Pull the dog against this object and tie the leash so the dog cannot move its head.
Step 1c: Muzzle the dog to protect yourself.
Step 2: Clip the hair around the wound.
Step 3: Flush the wound thoroughly with clean water. Avoid home antiseptics, which may cause pain when applied.
Step 4: Examine the wound. If the tissue under the wound appears to pass by when you move the skin, the wound will probably require stitches.
Step 5: DO NOT bandage. Allow the wound to drain unless there is excessive bleeding. If the wound does bleed excessively, follow these steps:
Step 5a: Cover wound with clean cloth, sterile dressing, or sanitary napkin.
Step 5b: Place your hand over the dressing and press firmly.
Step 5c: Keep pressure on the dressing to stop the bleeding.
Step 5d: If blood soaks through the dressing, DO NOT remove it. Apply more dressing and continue to apply pressure until the bleeding stops.
Step 6: If the wound is deep enough to require stitches, transport the dog immediately to the veterinarian.
Step 7: Be sure to contact your veterinarian if your dog is not current on its rabies vaccination.
Dogs are natural swimmers, but situations can occur where a dog swims too far and starts drowning. Turn to the next section to find out how to best handle this type of emergency.
How to Save a Drowning Dog
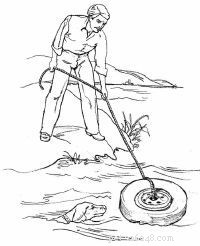
Dogs are naturally good swimmers for short distances, but they can get into trouble. Sometimes they get too far from the shore and tire trying to swim back, or they fall into a swimming pool and cannot get up the steep sides.
Always protect yourself when trying to rescue a drowning dog. An extra few moments of preparation can save two lives -- yours and the dog's. Also be sure to watch for signs of shock, which include pale or white gums, a rapid heartbeat, or rapid breathing. Use the following tips when rescuing a drowning dog.
Step 1: Rescue the dog.
Step 1a: Holding the attached rope, throw a life preserver toward the dog. OR
Step 1b: Try to hook the dog's collar with a pole. OR
Step 1c: Row out to the dog in a boat. OR
Step 1d: As a last resort, swim to the dog. Protect yourself. Bring something for the dog to cling to or climb on and be pulled to shore.
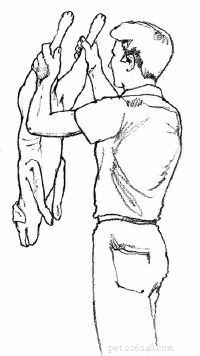
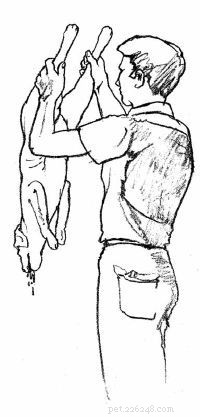
Step 2: Drain the dog's lungs.
Step 2a: If you can lift the dog, grasp the rear legs and hold the animal upside down for 15 to 20 seconds. Give 3 or 4 downward shakes to help drain fluid from its lungs.
Step 2b: If you cannot lift the dog, place it on a sloping surface with its head low to facilitate drainage.
Step 3: If the dog is not breathing, feel for a heartbeat by placing your fingers about 2 inches behind the dog's elbow in the middle of its chest.
Step 4: If the heart is not beating, proceed to Step 5. If it is, perform artificial respiration.
Step 4a: Turn the dog on its side.
Step 4b: Extend the dog's head and neck. Hold the dog's mouth and lips closed and blow firmly into its nostrils. Administer 1 breath every 3 to 5 seconds. Take a deep breath, and repeat until you feel resistance or see the chest rise.
Step 4c: After 10 seconds, stop. Watch the dog's chest for movement to indicate it is breathing on its own.
Step 4d: If the dog is not breathing, continue artificial respiration.
Step 5: If the heart is not beating, perform cardiopulmonary resuscitation (CPR).
CPR for Dogs Weighing up to 45 Pounds
Step 5a: Turn the dog on its back.
Step 5b: Kneel down at the head of the dog.
Step 5c: Clasp your hands over the dog's chest with your palms resting on either side of its chest.
Step 5d: Compress your palms on the chest firmly for a count of "2," and release for a count of "1." Moderate pressure is required. Repeat about 60 to 90 times per minute.
Step 5e: Alternately (after 30 seconds), hold the dog's mouth and lips closed and blow firmly into its nostrils. Blow for 3 seconds, take a deep breath, and repeat until you feel resistance or see the dog's chest rise. Try to repeat this 10 to 20 times per minute. As a general rule, use a CPR ratio of about 5 heart compressions to 1 breath of air.
Step 5f: After 1 minute, stop. Look at the chest for breathing movement, and feel for a heartbeat by placing fingers about 2 inches behind the dog's elbow in the center of its chest.
Step 5g: If the dog's heart is not beating, continue CPR. If the heart starts beating, but the dog is still not breathing, return to Step 4.
CPR for Dogs Weighing More Than 45 Pounds
Step 5a: Turn the dog on its side.
Step 5b: Place the palm of your hand in the middle of the dog's chest.
Step 5c: Press for a count of "2," and release for a count of "1." Firm pressure is required. Repeat about 60 to 90 times per minute.
Step 5d: Alternately (after 30 seconds), hold the dog's mouth and lips closed and blow firmly into its nostrils. Blow for 3 seconds, take a deep breath, and repeat until you feel resistance or see the chest rise. Try to repeat this 10 to 20 times per minute.
Step 5e: After 1 minute, stop. Look at the chest for breathing movement, and feel for a heartbeat by placing your fingers about 2 inches behind the dog's elbow in the center of its chest.
Step 5f: If the dog's heart is not beating, continue CPR. If the heart starts beating but the dog is still not breathing, return to Step 4.
Step 6: Transport the dog immediately to the veterinarian. CPR or artificial respiration should be continued until the dog is breathing and its heart is beating without assistance.
Puppies love to chew -- and they rarely discriminate between what they chew and what they avoid. If your puppy gets a hold of an electrical cord, you may be faced with treating electrical shock. Check the next section for tips on dealing with this type of pet emergency.
How to Treat a Dog in Electrical Shock
Grown dogs are seldom victims of electrical shock. But puppies are naturally curious and will chew almost anything, including electrical cords. If the insulation is punctured and the mouth comes in contact with both wires, the dog will receive a shock and may be unable to release the cord.
Electrocution can cause severe heart damage and fluid accumulation in the lungs. Strong shock can stop the heart, and CPR will need to be performed immediately to start the heart beating again. In addition, the dog's mouth will likely be burned from contact with the bare wires. Be sure to watch for signs of shock, which include pale or white gums, a rapid heartbeat, or rapid breathing.
To provide the proper care for your pet who is suffering from electrical shock, use the following tips.
Step 1: If the dog still has the electrical cord in its mouth, DO NOT touch the dog. First remove the plug from its outlet.
Step 2: If the dog is unconscious, check for breathing. If the dog is conscious and breathing, proceed to Step 6. If the dog is not breathing, feel for a heartbeat by placing your fingers about 2 inches behind the elbow in the middle of its chest.
Step 3: If the heart is not beating, proceed to Step 4. If it is, perform artificial respiration.
Step 3a: Turn the dog on its side, and extend its head and neck.

Step 3b: Hold the dog's mouth and lips closed and blow firmly into its nostrils. Administer 1 breath every 3 to 5 seconds. Take a deep breath, and repeat until you feel resistance or see the chest rise.
Step 3c: After 10 seconds, stop. Watch the dog's chest for movement to indicate the dog is breathing on its own.
Step 3d: If the dog is not breathing, continue artificial respiration.
Step 4: If the heart is not beating, perform CPR.
CPR for Dogs Weighing up to 45 Pounds
Step 4a: Turn the dog on its back.
Step 4b: Kneel down at the head of the dog.
Step 4c: Clasp your hands over the dog's chest with your palms resting on either side of its chest.
Step 4d: Compress your palms on the chest firmly for a count of "2," and release for a count of "1." Moderate pressure is required. Repeat about 60 to 90 times per minute.
Step 4e: Alternately (after 30 seconds), hold the dog's mouth and lips closed and blow firmly into its nostrils. Blow for 3 seconds, take a deep breath, and repeat until you feel resistance or see the dog's chest rise. Try to repeat this 10 to 20 times per minute. As a general rule, use a CPR ratio of about 5 heart compressions to 1 breath of air.
Step 4f: After 1 minute, stop. Look at the chest for breathing movement, and feel for a heartbeat by placing fingers about 2 inches behind the dog's elbow in the center of its chest.
Step 4g: If the dog's heart is not beating, continue CPR. If the heart starts beating, but the dog is still not breathing, return to Step 3.
CPR for Dogs Weighing More Than 45 Pounds
Step 4a: Turn the dog on its side.
Step 4b: Place the palm of your hand in the middle of the dog's chest.
Step 4c: Press for a count of "2," and release for a count of "1." Firm pressure is required. Repeat about 60 to 90 times per minute.
Step 4d: Alternately (after 30 seconds), hold the dog's mouth and lips closed and blow firmly into its nostrils. Blow for 3 seconds, take a deep breath, and repeat until you feel resistance or see the chest rise. Try to repeat this 10 to 20 times per minute.
Step 4e: After 1 minute, stop. Look at the chest for breathing movement, and feel for a heartbeat by placing your fingers about 2 inches behind the dog's elbow in the center of its chest.
Step 4f: If the dog's heart is not beating, continue CPR. If the heart starts beating but the dog is still not breathing, return to Step 3.
Step 5: Transport the dog immediately to the veterinarian. CPR or artificial respiration should be continued until the dog is breathing and its heart is beating without assistance.
Step 6: If the dog's mouth or lips are burned (bright red), swab them gently with 3% hydrogen peroxide.
Step 7: To conserve body heat, wrap the dog in a blanket or jacket.
Just like humans, dogs often have problems with their eyes due to dust, allergies, and other culprits. See the next page for tips on dealing with eye injuries.
How to Treat a Dog With Eye Injuries
Irritation of the eye in a dog can be caused by allergies, dust and dirt, lashes growing inward, fights, and more. It can result in a mild inflammation of the tissue around the eye (conjunctivitis) or severe damage to the cornea.
When examining a dog's eye, it is important to know that dogs have a third eyelid located in the corner of the eye nearest the nose. This third eyelid can completely cover the eyeball and sometimes gives the appearance that part of the eye is gone.
In addition to being a protective mechanism, the third eyelid can indicate that something is wrong with the eye. If it is raised and looks red, the eye is inflamed. Do not try to touch or manipulate this eyelid.
Other indications that a dog's eye is irritated are squinting and rubbing and pawing at the eye. Your first priority is to prevent your pet from further injuring itself since this often causes more severe damage than the original irritation. Use the following tips to treat your dog's eye injuries.
Object in the Eye
Step 1: DO NOT try to remove the object.
Step 2: Restrain the dog if necessary.
Step 2a: Approach the dog slowly, speaking in a reassuring tone of voice.
Step 3: Prevent self-injury to the eye.
Step 3a: Dewclaws (if present) should be bandaged on the front paw on the same side as the affected eye.
Step 3b: For small dogs, cut a large piece of cardboard into an Elizabethan-type collar.

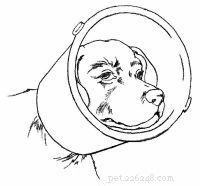
Step 3c: For larger dogs, cut the bottom from a plastic bucket, fit the bucket over the dog's head, and hold it in place by tying it to the dog's collar.
Step 4: Transport the dog immediately to the veterinarian.
Scratched or Irritated Eye
The typical signs of a scratched or irritated eye include squinting; rubbing or pawing at the eyes; or thick discharge or redness in the eye.
Step 1: Restrain the dog if necessary.
Step 1a: Approach the dog slowly, speaking in a reassuring tone of voice.
Step 2: Flush the dog's eye thoroughly with saline solution or plain water.
Step 3: Prevent self-injury to the eye.
Step 3a: Dewclaws (if present) should be bandaged on the front paw on the same side as the affected eye.
Step 3b: For small dogs, cut a large piece of cardboard into an Elizabethan-type collar.
Step 3c: For larger dogs, cut the bottom from a plastic bucket, fit the bucket over the dog's head, and hold it in place by tying it to the dog's collar.
Step 4: Transport the dog immediately to the veterinarian.
A dog can be sensitive to extreme cold, especially its ears and the tip of its tail. If you suspect your pet is suffering from frostbite, take note of the first-aid tips on the next page.
How to Treat a Dog That Has Frostbite
When a dog is exposed to freezing temperatures for a long period of time, there is always the possibility of frostbite. The signs of frostbite include pain, pale skin in early stages, and red or black skin in advanced stages.
The areas most likely to be frostbitten are those that have little or no hair and the ears and tail tip, which have a limited blood supply. Occasionally, if damage from frostbite is severe, part of the tail or ear tips may actually fall off. Professional attention should be sought before this happens. To provide proper care to a dog suffering from frostbite, use the following tips.
Step 1: Restrain the dog if necessary.
Step 1a: Approach the dog slowly, speaking in a reassuring tone of voice.
Step 1b: Slip a leash around the dog's neck, then place the leash around a fixed object. Pull the dog against this object and tie the leash so the dog cannot move its head.
Step 1c: Muzzle the dog to protect yourself, if necessary.
Step 2: Warm the area with moist towels. The water temperature should be warm but not hot (75 degrees Fahrenheit/24 degrees Celsius). DO NOT use ointment.
Step 3: If the skin turns dark, transport the dog to the veterinarian as soon as possible.
Just as exposure to extreme cold can be harmful to your pet, so, too, can extreme heat. Check the next section to learn how to treat a dog that has heatstroke.
How to Treat a Dog That Has Heatstroke
Heatstroke is caused by the inability of the body to maintain its normal temperature because of the environmental heat. It is often caused by keeping a dog in a locked car parked in the sun or by keeping it in any hot area without adequate ventilation.
The signs of heatstroke are excessive drooling, lack of coordination, rapid breathing, and a top of the head that is hot to the touch. Prompt treatment is urgent. Body temperatures often get as high as 107 degrees Fahrenheit/41.5 degrees Celsius, and without quick cooling, severe brain damage and death will occur.
Heatstroke can be prevented by making sure your dog has plenty of shade and ventilation. If you must take your dog driving with you, park in the shade and leave all the windows partially open.
Should heatstroke occur, use the following suggestions to help you provide your dog with the utmost care.
Step 1: Remove the dog from the hot environment.
Step 2: Immerse the dog in a cold water bath or continuously run a garden hose on its body; continue either treatment for at least 30 minutes.
Step 3: Apply ice packs to the top of the head; keep them there while transporting the dog to the veterinarian.
Step 4: Transport the dog to the veterinarian immediately after the above treatment.
Another pet injury that requires immediate professional treatment is hypothermia. Check the next page for tips on what to do if you suspect your pet is suffering from this condition.
How to Treat a Dog That Has Hypothermia
Exposure to either cold water or freezing temperatures can cause hypothermia, or subnormal body temperatures. A dog's survival will depend on how low its body temperature drops.
A dog's normal body temperature is 100 to 101 degrees Fahrenheit/38 degrees Celsius. If it drops below 90 degrees Fahrenheit/32 degrees Celsius for any length of time, normal bodily functions will be severely impaired.
The signs of hypothermia include depression, subnormal body temperature, and coma. This condition always requires veterinary attention as soon as possible. Use the following tips to help you provide proper care to a dog suffering from hypothermia.
Step 1: Warm the dog.
Step 1a: Place a hot water bottle (100 degrees Fahrenheit/37 degrees Celsius) against the dog's abdomen. Wrap the bottle in a cloth to prevent burns. Wrap the dog in a blanket or jacket.
Step 2: Transport the dog immediately to the veterinarian.
Just like humans, dogs can be allergic to insect bites, so it's important to know the warning signs. Learn more about treating insect stings on the next page.
How to Treat a Dog With an Insect Bite or Sting
While most insect bites to a dogwill be uneventful, if your pet has been stung by a bee, wasp, yellow jacket, or hornet, the area will quickly become swollen and somewhat painful. A possible allergic reaction to the venom deposited by the insect is the most serious problem.
The signs of an insect bite include swelling, pain in the muscles and affected area, vomiting, weakness, fever, and shock. The signs of shock are pale or white gums, a rapid heartbeat, or rapid breathing. Below are helpful suggestions on what to do if your pet has been stung by a pest.
Step 1: Restrain the dog if necessary.
Step 1a: Approach the dog slowly, speaking in a reassuring tone of voice.
Step 1b: Muzzle the dog to protect yourself, if necessary.
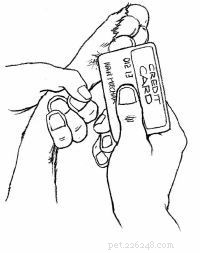
Step 2: DO NOT pinch the area. If the dog has been stung by a bee, scrape the stinger off immediately with a credit card or dull knife. Other insects do not leave the stinger in the skin.
Step 3: If the affected area is swollen and hot, apply cortisone cream and hold ice on the dog's skin for a short time.
Step 4: Administer antihistamine such as diphenhydramine (Benadryl) orally at a dose of 1mg per pound of body weight (e.g., a 25-pound dog would get 25mg pill or capsule).
Step 5: If the dog experiences any difficulty breathing or if its face seems swollen, transport the dog immediately to the veterinarian.
Did you know your house is filled with products that are poisonous to your beloved pet? Check the next page to find out what they are and what to do if your dog gets a hold of one of these harmful substances.
How to Treat a Poisoned Dog
Dogs are curious creatures and like to investigate, which leads to many accidental poisonings each year. Often a dog will find an open can or bottle of some chemical and, accidentally or on purpose, spill it. Naturally the chemical gets on its fur and paws, and while licking the area clean, it swallows the possibly toxic substance. It is your responsibility as a pet owner to keep all potentially toxic products tightly closed and out of your dog's reach.
Some of the signs of a possible poisoning include excessive drooling, vomiting, diarrhea, abdominal pain, twitching, nervousness, convulsions, coma, and a chemical odor on the body. Here's what you can do if your dog is poisoned:
Step 1: If the dog is comatose or convulsing, wrap it in a blanket and transport your pet immediately to the veterinarian with the suspect poison container, plant, or leaf.
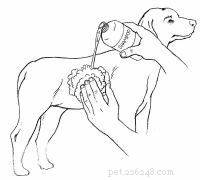
Step 2: If the dog has a chemical odor on its skin, wash the entire dog with mild soap until the odor is gone. If the poison was licked or ingested, flushing the dog's mouth with clean water may also help in decontamination.
Step 3: If the dog has not already vomited and the poison is not a caustic or petroleum product (see lists below), induce vomiting by giving 1 tablespoon of 3% hydrogen peroxide per 20 pounds every 10 minutes until vomiting starts. If no vomiting occurs within 30 minutes, transport the dog immediately to the veterinarian with the suspected poison container.
Step 4: Call the Pet Poison Control hotline for further instructions at 888-426-4435. (There is a charge for this service.)
Caustics include battery acid, corn and callous remover, dishwashing detergent, drain cleaner, grease remover, lye, and oven cleaner. Petroleum products include paint solvent, floor wax, and dry-cleaning solution.
You might be surprised by the number of household items that are poisonous to your dog. Some of the most common are alcoholic beverages, ammonia, antifreeze, bleach, chocolate (baking chocolate is the worst), detergents, disinfectants, dry-cleaning solution, fertilizer, furniture polish, gasoline, glue, grapes and raisins, human medications, mothballs, mouse and rat poison, onions, oven cleaners, paint thinner and remover, shoe polish, silver polish, and toilet bowl cleaner.
In addition, some household plants are toxic to your pet, including aloe vera, amaryllis, avocado, azalea, bird of paradise, calla lily, castor bean, corn plant, cyclamen, daffodil, day lily, dieffenbachia, Easter lily, elephant ears, English ivy, gladiolus, holly, hyacinth, hydrangea, iris, kalanchoe, macadamia nut, mistletoe, narcissus, onion, philodendron, poinsettia, rhododendron, tomato plant, tulip, yew, and yucca.
(This is only a partial list. For a more complete listing, refer to the ASPCA Animal Poison Center at www.aspca.org.)
Dogs can also become poisoned from smoke or carbon monoxide. Check the next section for tips on what to do in this first-aid emergency.
How to Treat a Dog That Has Smoke or Carbon Monoxide Inhalation

Fires are another possible threat to dogs. Do not risk your own life to save your dog. Leave that task to the firefighters or those trained in rescue.
The signs of smoke or carbon monoxide inhalation include depression, lack of coordination, heavy panting, deep red gums, and possible convulsions. Also watch for signs of shock, which are pale or white gums, a rapid heartbeat, or rapid breathing.
If suspect your pet is suffering from smoke or carbon monoxide inhalation, use the following tips to provide the dog with proper care.
If the Dog Is Conscious
Step 1: Remove the dog from the area and into fresh air immediately.
Step 2: Flush the dog's eyes thoroughly with saline solution or clean water.
Step 3: Transport the dog immediately to the veterinarian.
If the Dog Is Unconscious
Step 1: Remove the dog from the area and into fresh air immediately.
Step 2: If the dog is not breathing, feel for a heartbeat by placing your fingers about 2 inches behind the dog's elbow in the middle of its chest.
Step 3: If the heart is not beating, proceed to Step 4. If it is, perform artificial respiration.
Step 3a: Turn the dog on its side.
Step 3b: Hold the dog's mouth and lips closed and blow firmly into its nostrils. Administer 1 breath every 3 to 5 seconds. Take a deep breath, and repeat until you feel resistance or see the dog's chest rise.
Step 3c: After 1 minute, stop. Watch the chest for movement to indicate the dog is breathing on its own.
Step 3d: If the dog is not breathing, continue artificial respiration.
Step 4: If the heart is not beating, perform cardiopulmonary resuscitation (CPR).
CPR for Dogs Weighing up to 45 Pounds
Step 4a: Turn the dog on its back.
Step 4b: Kneel down at the head of the dog.
Step 4c: Clasp your hands over the dog's chest with your palms resting on either side of its chest.
Step 4d: Compress your palms on the chest firmly for a count of "2," and release for a count of "1." Moderate pressure is required. Repeat about 60 to 90 times per minute.
Step 4e: Alternately (after 30 seconds), hold the dog's mouth and lips closed and blow firmly into its nostrils. Blow for 3 seconds, take a deep breath, and repeat until you feel resistance or see the dog's chest rise. Try to repeat this 10 to 20 times per minute. As a general rule, use a CPR ratio of about 5 heart compressions to 1 breath of air.
Step 4f: After 1 minute, stop. Look at the chest for breathing movement, and feel for a heartbeat by placing your fingers about 2 inches behind the dog's elbow in the center of its chest.
Step 4g: If the dog's heart is not beating, continue CPR. If the heart starts beating, but the dog is still not breathing, return to Step 3.
CPR for Dogs Weighing More Than 45 Pounds
Step 4a: Turn the dog on its side.
Step 4b: Place the palm of your hand in the middle of the dog's chest.
Step 4c: Press for a count of "2," and release for a count of "1." Firm pressure is required. Repeat about 60 to 90 times per minute.
Step 4d: Alternately (after 30 seconds), hold the dog's mouth and lips closed and blow firmly into its nostrils. Blow for 3 seconds, take a deep breath, and repeat until you feel resistance or see the chest rise. Try to repeat this 10 to 20 times per minute.
Step 4e: After 1 minute, stop. Look at the chest for breathing movement, and feel for a heartbeat by placing your fingers about 2 inches behind the dog's elbow in the center of its chest.
Step 4f: If the dog's heart is not beating, continue CPR. If the heart starts beating but the dog is still not breathing, return to Step 3.
Step 5: Transport the dog immediately to the veterinarian. CPR or artificial respiration should be continued on the way to the veterinarian or until the dog is breathing and its heart is beating without assistance.
A puncture wound can be quite painful and traumatic for a dog. In the next section, we'll learn how to treat this type of injury.
How to Help a Dog That Has a Puncture Wound
A puncture wound on a dog may be difficult to see because it is often covered with hair. Since the most common location for a puncture wound is the bottom of the paw, the first sign may be a limp. Slightly blood-tinged fur is a common sign of a puncture wound on other parts of the body.
If you suspect your dog has a puncture wound, be sure to watch for signs of shock, which include pale or white gums, a rapid heartbeat, or rapid breathing. The following tips will help you treat your wounded pet.
If the Object Is Protruding
Step 1: Restrain the dog if necessary, taking care not to touch the object.
Step 1a: Approach the dog slowly, speaking in a reassuring tone of voice.
Step 1b: Slip a leash around the dog's neck, then place the leash around a fixed object. Pull the dog against this object and tie the leash so the dog cannot move its head.
Step 1c: Muzzle the dog to protect yourself if necessary.
Step 2: DO NOT attempt to remove the object.
Step 3: Place clean cloths, sterile dressings, or sanitary napkins around the point of entry.
Step 4: Bandage tightly around the point of entry.
Step 5: Transport the dog immediately to the veterinarian.
Other Puncture Wounds

Step 1: Restrain the dog if necessary.
Step 1a: Approach the dog slowly, speaking in a reassuring tone of voice.
Step 2: If the wound is in the chest and a "sucking" noise is heard, bandage tightly enough to seal the wound, and transport the dog immediately to the veterinarian.
Step 3: If the wound is not in the chest, clip the hair around the wound.

Step 4: Examine the wound carefully for foreign objects. If present, remove the object with tweezers or needle-nose pliers.
Step 5: Flush the wound thoroughly with clean water. Avoid home antiseptics, which may cause pain when applied.
Step 6: DO NOT bandage. Allow the wound to drain unless there is excessive bleeding. If the wound does bleed excessively, follow these steps:
Step 6a: Cover wound with clean cloth, sterile dressing, or sanitary napkin.
Step 6b: Place your hand over the dressing and press firmly.
Step 6c: Keep pressure on the dressing to stop the bleeding.
Step 6d: If blood soaks through the dressing, DO NOT remove it. Apply more dressing and continue to apply pressure until the bleeding stops.
Step 7: If the bleeding does not stop within 5 minutes, continue to apply pressure on the wound while transporting the dog to the veterinarian.
Knowing how to identify the signs of shock and how to treat it will help you in many pet first-aid situations. In the next section, learn about proper care for dogs experiencing shock.
How to Treat a Dog in Shock
Shock is extremely serious; it is the No. 1 killer in accidents. Shock is a reaction to heavy internal or external bleeding or any serious injury that "scares" the body; for example, a large wound or amputation with heavy blood loss. The body tries to compensate for the loss by speeding up the heart rate to keep the blood pressure from falling. At the same time the blood vessels that supply the outside of the body narrow. This is to conserve blood so vital organs of the body can continue to receive their normal blood supply.
However, if there is heavy blood loss or other serious injury, the body overreacts and causes a pooling of blood in the internal organs. This can cause death due to a drop in external blood pressure and possible oxygen starvation of the brain.
The signs of shock include pale or white gums, a rapid faint heartbeat, rapid breathing, or below-normal body temperature (feels cold). If your dog is in shock, use the following tips to provide proper first aid.
Step 1: Examine the dog for shock.
Step 1a: Examine the gums by gently lifting the dog's upper lip so the gum is visible. Pale or white gums indicate the dog is almost certainly in shock and may have serious internal injuries and/or bleeding. If the gums are pink, the dog is probably not in shock.
Step 1b: Determine the dog's heartbeat. Place your fingers firmly on the dog about 2 inches behind the dog's elbow in the center of its chest. Count the number of beats in 10 seconds and multiply by 6. If the dog is in shock its heartbeat may be more than 150 beats per minute.
Step 2: Place the dog on its side with its head extended.
Step 3: Gently pull out the dog's tongue to keep the airway open.
Step 4: Elevate the dog's hindquarters slightly by placing them on a pillow or folded towels.
Step 5: Stop visible bleeding immediately. If blood is spurting and the wound is on the leg or tail, proceed to Step 6.
Step 5a: Cover the wound with a clean cloth, sterile dressing, or sanitary napkin.
Step 5b: Place your hand over the dressing and press firmly.
Step 5c: Keep pressure on the dressing to stop bleeding. If blood soaks through the dressing, DO NOT remove it. Apply more dressing and continue to apply pressure until the bleeding stops. If bleeding does not stop within 5 minutes, continue to apply pressure on the wound while transporting the dog to the veterinarian.
Step 5d: Wrap torn rags or other soft material around the dressing and tie or tape it just tightly enough to keep the bandage on. Start below the wound and wrap upward.
Step 6: If bleeding does not stop within 5 minutes, transport the dog immediately to the veterinarian.
Step 7: To conserve body heat, wrap the dog in a blanket or jacket.
A dog's encounter with a skunk is not only smelly, but it can also be dangerous, since skunks are a major carrier of rabies. Turn to the next page to find out what to do if your pet has been sprayed by a skunk.
How to Treat a Dog That Has Been Sprayed by a Skunk
Skunks are one of the major carriers of rabies in North America. Therefore, a dog's encounter with a skunk should be treated as more than just a stinky situation. Use the following suggestions to provide proper care for your pet.
Step 1: Restrain the dog if necessary.
Step 1a: Approach the dog slowly, speaking in a reassuring tone of voice.
Step 1b: Slip a leash around the dog's neck, then place the leash around a fixed object. Pull the dog against this object and tie the leash so the dog cannot move its head.
Step 1c: Muzzle the dog to protect yourself.
Step 2: Flush the dog's eyes with fresh water.
Step 3: Remove and destroy leather collars or harnesses.
Step 4: Bathe the dog thoroughly with soap or shampoo and water. Repeat several times.

Step 5: Apply plain tomato juice liberally. After several minutes, bathe the dog again with soap or shampoo and water. Time will eventually remove the odor. Skunk odor neutralizers are available.
Step 6: If the skunk is destroyed, take it to the veterinarian for a rabies examination. DO NOT touch the skunk with your bare hands.
Step 7: If the dog is not currently vaccinated for rabies, contact the veterinarian.
An encounter with a snake can also create a pet emergency situation. See the next section for how to treat snakebites.
How to Treat a Dog That Has a Snakebite
Poisonous snakebites are rare in North America. Most snakes are nonpoisonous, and neither poisonous nor nonpoisonous snakes will attack a dog unless provoked. But many pets are curious, and bites will occur.
If you live in or visit a snake-inhabited area, you can expect problems if you let your dog run loose. Be prepared by reading the following tips for treating snakebites.
Poisonous
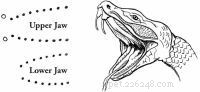
The signs of a poisonous snakebite are two fang marks, pain, swelling, vomiting, difficulty breathing, and possible paralysis and convulsions. Be sure to watch for sings of shock, which include pale or white gums, a rapid heartbeat, or rapid breathing.
Treatment must begin as soon as possible after the bite. If the snake was killed, bring it to the veterinarian for identification. Otherwise, try to remember identifying marks.
Step 1: Restrain the dog if necessary.
Step 1a: Approach the dog slowly, speaking in a reassuring tone of voice.
Step 1b: Slip a leash around the dog's neck, then place the leash around a fixed object. Pull the dog against this object and tie the leash so the dog cannot move its head.
Step 1c: Muzzle the dog to protect yourself if necessary.
Step 2: Clip the hair from the bite area.
Step 3: Flush thoroughly by pouring 3% hydrogen peroxide directly on the bite.
Step 4: Transport the dog immediately to the veterinarian.
Nonpoisonous
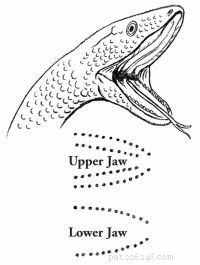
The signs of a nonpoisonous snakebite are a U-shape bite and pain in the bite area. If you are not sure the snake is nonpoisonous, treat as poisonous. See above.
Step 1: Restrain the dog if necessary.
Step 1a: Approach the dog slowly, speaking in a reassuring tone of voice.
Step 1b: Slip a leash around the dog's neck, then place the leash around a fixed object. Pull the dog against this object and tie the leash so the dog cannot move its head.
Step 1c: Muzzle the dog to protect yourself, if necessary.
Step 2: Clip the hair from the bite area.
Step 3: Flush thoroughly by pouring 3% hydrogen peroxide directly on the bite.
Various injuries may cause unconsciousness in a dog. Turn to the next section for tips on what to do in this emergency situation.
How to Treat an Unconscious Dog
Your first priority when dealing with an unconscious dog is to get the heart beating and the dog breathing. Also be sure to watch for signs of shock, which include pale or white gums, a rapid heartbeat, or rapid breathing. Use the following tips to provide proper treatment to a dog that has lost consciousness.
Step 1: If you suspect choking, clear the dog's airway. If the dog is not choking, proceed to
Step 2.
Step 1a: Open the dog's mouth carefully by grasping the upper jaw with one hand over the muzzle.
Step 1b: Press the dog's lips over the upper teeth by pressing your thumb on one side and your fingers on the other so that the lips are between the dog's teeth and your fingers. Apply firm pressure to force the mouth open.
Step 1c: If you can see the object, try to remove it with your fingers.
Step 1d: If you cannot remove the object and the dog is small enough, pick it up by grasping its back legs; turn it upside down and shake vigorously. Slapping its back while shaking may help to dislodge the object.
Step 1e: If you cannot remove the object and the dog is too large to pick up, place the dog on its side on the floor. Place your hand just behind the rib cage and press down and slightly forward quickly and firmly. Release. Repeat rapidly several times until the object is expelled.
Step 1f: If you cannot dislodge the object, transport the dog immediately to the veterinarian.
Step 2: If the dog is breathing, check for shock. If the dog is not breathing, proceed to Step 3.
Step 2a: Examine the gums by gently lifting the upper lip so the gum is visible. Pale or white gums indicate the dog is almost certainly in shock and may have serious internal injuries and/or bleeding. If the gums are pink, the dog is probably not in shock.
Step 2b: Determine the heartbeat. Place fingers firmly on the dog about 2 inches behind the dog's elbow in the center of its chest. Count the number of beats in 10 seconds and multiply by 6. If the dog is in shock its heartbeat may be more than 150 beats per minute.
Step 2c: Place the dog on its side with its head extended. Gently pull out the dog's tongue to keep the airway open.
Step 2d: Elevate the dog's hindquarters slightly by placing them on a pillow or folded towels. To conserve body heat, wrap the dog in a blanket or jacket.
Step 2e: Transport the dog immediately to the veterinarian.
Step 3: Feel for a heartbeat by placing your fingers about 2 inches behind the dog's elbow in the middle of its chest.

Step 4: If the dog's heart is not beating, proceed to Step 5. If it is, perform artificial respiration.
Step 4a: Turn the dog on its side.
Step 4b: Hold the dog's mouth and lips closed and blow firmly into its nostrils. Administer 1 breath every 3 to 5 seconds. Take a deep breath, and repeat until you feel resistance or see the dog's chest rise.
Step 4c: After 10 seconds, stop. Watch the chest for movement to indicate the dog is breathing on its own.
Step 4d: If the dog is not breathing, continue artificial respiration.
Step 5: If the heart is not beating, perform CPR.
CPR for Dogs Weighing up to 45 Pounds
Step 5a: Turn the dog on its back.
Step 5b: Kneel down at the head of the dog.
Step 5c: Clasp your hands over the dog's chest with your palms resting on either side of its chest.
Step 5d: Compress your palms on the chest firmly for a count of "2," and release for a count of "1." Moderate pressure is required. Repeat about 60 to 90 times per minute.
Step 5e: Alternately (after 30 seconds), hold the dog's mouth and lips closed and blow firmly into its nostrils. Blow for 3 seconds, take a deep breath, and repeat until you feel resistance or see the dog's chest rise. Try to repeat this 10 to 20 times per minute. As a general rule, use a CPR ratio of about 5 heart compressions to 1 breath of air.
Step 5f: After 1 minute, stop. Look at the chest for breathing movement, and feel for a heartbeat by placing your fingers about 2 inches behind the dog's elbow in the center of its chest.
Step 5g: If the dog's heart is not beating, continue CPR. If the heart starts beating, but the dog is still not breathing, return to Step 4.
CPR for Dogs Weighing more than 45 Pounds
Step 5a: Turn the dog on its side.
Step 5b: Place the palm of your hand in the middle of the dog's chest.
Step 5c: Press for a count of "2," and release for a count of "1." Firm pressure is required. Repeat about 60 to 90 times per minute.
Step 5d: Alternately (after 30 seconds), hold the dog's mouth and lips closed and blow firmly into its nostrils. Blow for 3 seconds, take a deep breath, and repeat until you feel resistance or see the chest rise. Try to repeat this 10 to 20 times per minute.
Step 5e: After 1 minute, stop. Look at the chest for breathing movement, and feel for a heartbeat by placing your fingers about 2 inches behind the dog's elbow in the center of its chest.
Step 5f: If the dog's heart is not beating, continue CPR. If the heart starts beating but the dog is still not breathing, return to Step 4.
Step 6: Transport the dog immediately to the veterinarian. CPR or artificial respiration should be continued on the way to the veterinarian or until the dog is breathing and its heart is beating without assistance.
Like diarrhea, vomiting is not necessarily a serious problem unless a dog becomes dehydrated. Check the next page for tips on what potential problems to look for.
How to Treat a Vomiting Dog
Vomiting is one of the most commonly encountered problems in veterinary medicine. It is nature's way of permitting the dog to rid its stomach of an irritating substance such as spoiled food.
But not all vomiting is due to simple irritation. More serious causes are viral infections or diseases of the liver, pancreas, or kidney. It is important to seek professional help if there are signs of bleeding or if the dog is depressed and still vomiting after initial efforts at control have failed. Here are some tips for treating a vomiting dog:
Step 1: Remove all food and water for at least 12 to 24 hours.
Step 2: If vomiting contains blood or is frequent, contact the veterinarian immediately. If not, proceed to Step 3.
Step 3: After 12 to 24 hours of no vomiting, introduce water gradually at 1 to 2 ounces at a time. If no vomiting occurs, offer a bland diet of boiled skinless chicken and rice (50:50 mixture). If this is held down, transition to regular diet over the next 2 days by mixing an increasing quantity of regular dog food with bland diet.
Step 4: Pepto-Bismol can be safely used for dogs. Call the veterinarian for recommended dose.
A dog giving birth to puppies can be quite an amazing experience -- for both the dog and its owner. Turn to the next page to learn how to be prepared to help a dog if problems occur during the birth process.
How to Help a Dog That Is Having Puppies
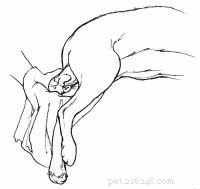
A dog's normal length of pregnancy (gestation period) is 61 to 63 days. However, delivery 1 or 2 days earlier or later is not unusual and presents no cause for alarm as long as the general health of the dog is good.
In preparation for whelping, the dog will make a nest with newspapers and rags if they are available. If they are not, she may dig into the carpeting with her front paws, almost as if she were digging a hole. This is termed "nest building" and is a fairly consistent sign that delivery will follow soon, usually within 2 to 3 days. To make your pet feel comfortable about delivering (and to save your carpet!) provide a whelping box with plenty of newspapers and rags.
At about the same time the nest building occurs, you should also notice an enlargement of the breasts with milk production. Another fairly consistent method of determining when the dog will deliver is to take her temperature each day. Approximately 24 hours before delivery, her temperature will drop about 2 degrees Fahrenheit/1 degree Celsius.
When she is getting close to labor, a mucous discharge appears at the vulva followed by a greenish discharge. At no time should there be a brown or foul-smelling discharge. If this is present, contact your veterinarian immediately.
The onset of labor will make the dog somewhat restless, but it is not until the second stage of labor that she will actually lie down and have abdominal contractions. Once the second stage of labor begins, delivery should begin within 3 hours. If no pups are delivered by that time, professional help should be obtained.
A puppy may be born in one of three ways. The most common presentation is head and feet first. The second most common is rear legs and tail first, not to be confused with a true breech birth. In a true breech only the rump is presented, with the rear legs folded under the body of the puppy. In a small bitch, this type of presentation can cause problems and should be watched for carefully.
Complications may arise during the birthing process that you can handle quite easily by using the tips below.
If the Puppy Is Stuck in the Birth Canal Half Exposed
Step 1: Grasp the puppy with a clean towel.
Step 2: Applying steady traction, gently pull the puppy at a slight downward angle. Continue pulling gently and steadily until the pup is delivered.
Step 3: If you are unable to remove the puppy, contact the veterinarian immediately.
If the Mother Doesn't Clean the Puppy After Delivery
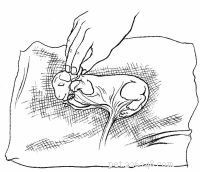
Step 1: Put the pup, covered in the fetal membrane, on a clean towel.
Step 2: Peel the membrane off its face immediately.
Step 3: Continue to pull the membrane from its body. The membrane will collect around the umbilical cord. DO NOT pull on the umbilical cord.
Step 4: Wipe any fluid off the nostrils and mouth. Rub the puppy's body vigorously with a towel to stimulate breathing.
Step 5: If there is heavy mucus in the mouth and nose, clean out what you can with your finger.
Step 6: If the puppy is still having trouble breathing:
Step 6a: Place the puppy in a towel on the palm of your hand.
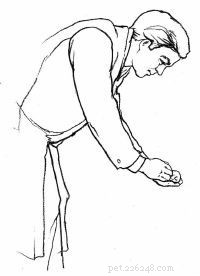
Step 6b: Cradle its head by closing your thumb toward your fingers.
Step 6c: Using your other hand to secure the puppy, lift your hands to head level and swing firmly down toward the floor. Repeat several times.
Step 6d: Vigorously rub the puppy again with the towel.
Step 6e: Stop when the puppy is actively moving and crying.
Step 7: Tie a thread around the umbilical cord about 1 inch above the puppy's abdomen. Leaving the tied portion attached to the puppy, cut off the rest of the umbilical cord and fetal membrane.
Step 8: Place the puppy with its mother. She will take care of the rest. If she does not take care of the puppies, or if any other problem develops, contact the veterinarian as soon as possible.
Seeing a dog hurt or in distress can be such a helpless feeling. By learning the tips outlined in this article, you can arm yourself with dozens of first-aid techniques that may end up saving the life of your beloved pet.
Publications International, Ltd.